

The story is originally published on **Ipenywis.com, You can find another awesome tutorial like this and more at [Ipenywis](ipenywis.com) and My [Youtube Channel](youtube.com/channel/UCMm15RFnHUvM-aSc50e7R9..
Video Tutorial
Node.js Quick Intro
Node.js is a Cross Development Environment Create By Ryan Dahl in 2009 for an efficient and reliable environment, based on javascript.
Node.js uses an event-driven, non-blocking I/O model that makes it lightweight and efficient, perfect for data-intensive real-time applications that run across distributed devices. It is an open source, a cross-platform runtime environment for developing server-side applications.
So Why you would consider learning Node.js?
Here are a few pros and reasons to think about learning and working with Node.js on your next project.
Based on Javascript (Front & Back).
Built-in Asynchronous Event-Driven System.
Runs on a Single Thread Non-Blocking Architecture.
A large set of Packages and Modules.
Great for creating APIs Data friendly apps.
Awesome Frameworks built around it.
Node.js Event-Loop
The Event-Loop is the main core of running and executing Asynchronous code on Node.js, So understanding how Node.js works behind the scenes and executes your code is really important to create high level, performance friendly applications.
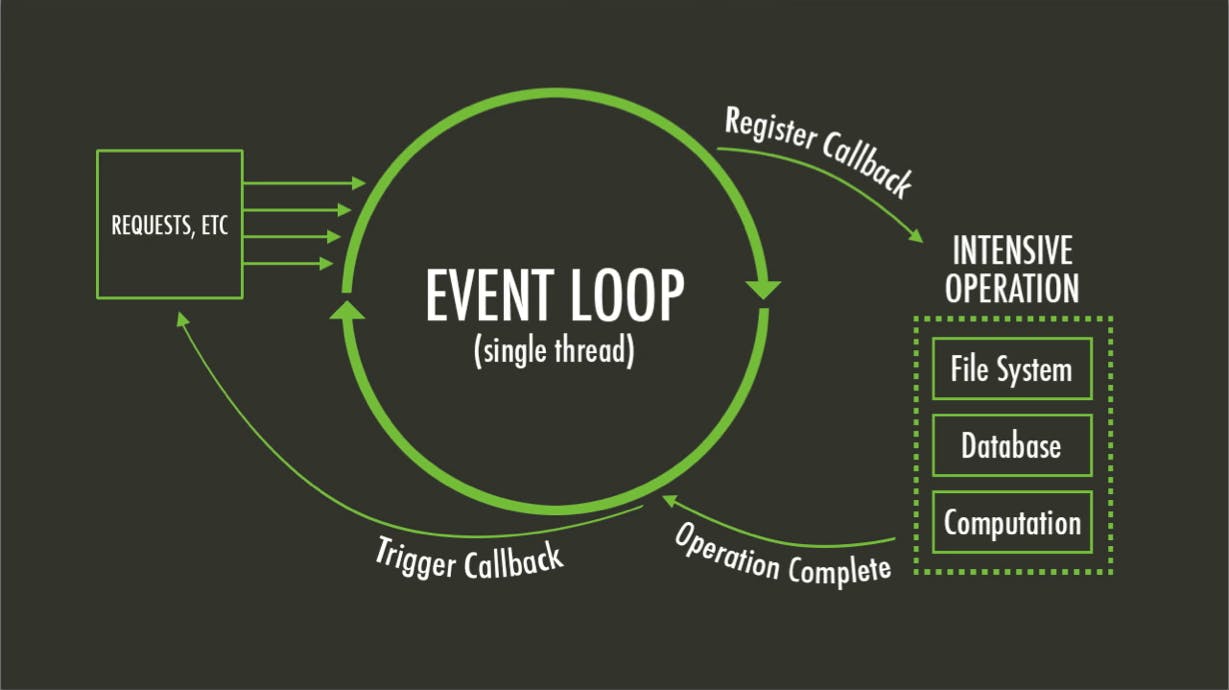
Node.js Event loop registers your event with their associated listeners and once the operation is completed which could be running on other thread(s) like I/O operations run on multiple threads to accommodate the requests and it executes its callback listener with the specified data.
The only part that runs on a single thread on the Node.js Echo-System is the Event-Loop to have a smooth performance and be able to continually run on the server.
Node.js Architecture
Node.js is built on top of C++ which is one of the most performance friendly languages which allows it to implement some of its parts using other libraries to handle specific tasks like running the event loop or handling the I/O calls to accommodate cross-platform environment.
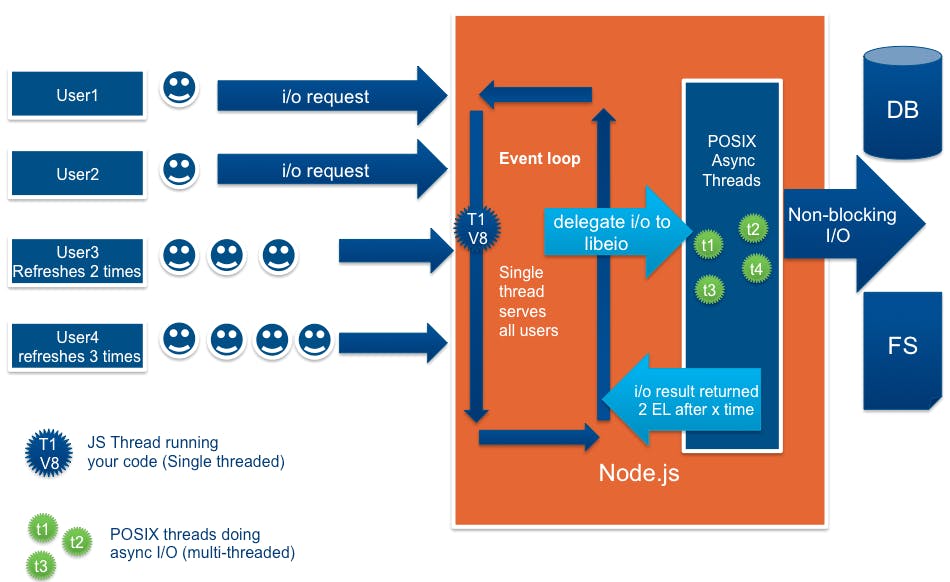
The Architecture represents a Server Infrastructure built using Node.js and shows how Node.js handles and connects to the database/filesystem throw the standard I/O POSIX system.
And that’s why a lot of servers is built using Node.js since it can handle as many requests as possible with a good process and response time.
Also, Node.js is built on top of Chrome V8 engine which is so far the most reliable and performance friendly javascript compiler and runtime-engine you can find nowadays.
Who uses Node.js
Since the first release of Node.js, a lot of teams and companies started pivoting their apps and server infrastructures to use Node.js instead for Example Java EE or PHP here are some of the tech-lead companies that use Node.js on their servers.

Now enough talking about theoretical stuff and let us jump right into code.
Getting Started
Now let’s try to set up and install Node.js, it is available for (Windows, Linux, and Mac OS X) so the installation may differ from one platform to another but it is very simple just one click to install and set up the development environment.
Go the **official website** and download the installer for your platform (download the latest version).
Install it normally as any other software, Both Nodejs and NPM CLI (Node Package Manager) will installed on your machine.
You also, need a Code Editor for typing your code and a Terminal (for ex: CMD) for running your javascript files using node compiler and that’s why I love to use VSCode Code Editor it is very lightweight and provides you with features like integrated terminal and IDE based environment for running you Node apps in a click of a button plus a lot of other cool features.
Grab it from **Here**.
You still can use whatever code editor you prefer for following along the tutorial.
Now Open up VScode or another code editor with a terminal and create a project folder for putting all of your project files.
Initialize Your Node.js Project
Initializing is simply adding a configuration for identifying your project and make it compatible with the Node.js Project Ecosystem to be able to run it, install third-party packages or distributes it to the NPM repository.
npm init
You will be asked a couple of questions concerning your project make sure to fill it respectively.
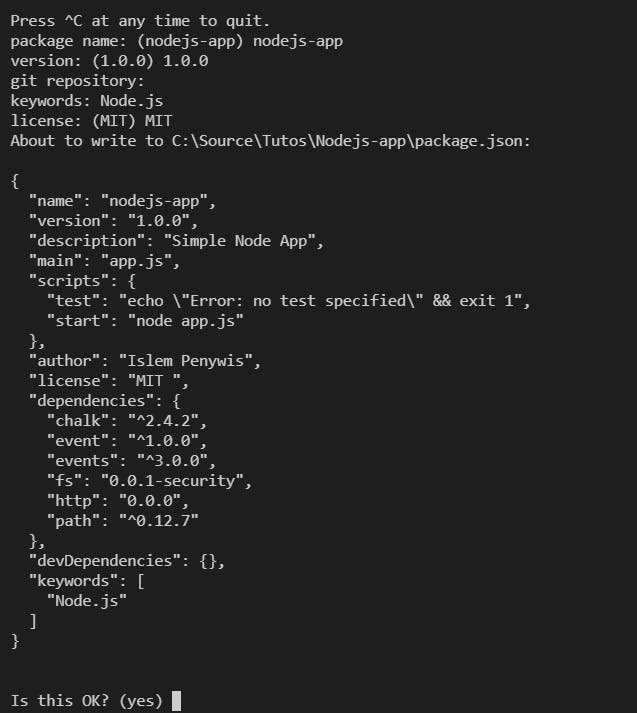
This will create a package.json JSON file on the root directory of your project (project folder).
Node.js REPL
So for those of you who don’t know what is REPL, it actually stands for Read, Evaluate, Print and Loop and they are the basic operations for an Interactive Command Line Interpreter, and that what will REPL gives it being shipped with Nodejs and it is pretty much like (Shell or bash) that will allow you to type javascript code on your terminal pretty much like doing it on an Editor then running on the Interpreter (Your Browser).
It allows you to type and execute one command at a time, mostly used for testing some data or doing a quick javascript test for a specific API.
node
This will run the interactive REPL for you where you can type and execute normal javascript code.
$ node > var current = new Date()
undefined
> current 2019-02 27T17:43:15.055Z > console.log("1 + 1 = ", 1+1) 1 + 1 = 2
undefined
>
Running Modules(Scripts).
A script or a module is a javascript file the reason behind calling it a module is simply because once it will be executed by Nodejs interpreter it will be provided with a runtime-environment which has global variables and specific scope only access by through this module only unless we explicitly export it.
Create a new javascript file under the root directory name it app.js (which is most of the time represent the main entry point of your application).
/* app.js */ console.log("Hello World");
To execute the Script (Module) just run it through the terminal with the node compiler.
node app.js
NPM Scripts
Scripts are a way to easily execute commands and shortened them into much simpler and easier commands for either you throughout the development process or other developers who are working with you at the same project or even when releasing it on Github as open-source.
Add script on the package.json under the scripts object, a script has a key and a value the key represents the shortened command you will be using to the execute the real command which will be put in the value field.
"scripts": {
  "test": "echo \"Error: no test specified\" && exit 1",
  //Add the start script
  "start": "node app.js"
},
Now instead of the typing the node command to run a script or start the application, you just run it through NPM.
npm run start
Export/Import Objects
A single Module is contained with all it’s objects and function so another module cannot implicitly access or mutate other modules data.
So this is where you can export some objects or functions you need to import and use from other modules.
So let’s say we have app.js module and a bootstrap.js module living in the same directory and we have a Pet object that needs to be accessed from the app.js.
/* bootstrap.js */
//Some Object
const Pet = { name: "Mino", type: "Cat" };

//Here we export the Pet object (Default Export).
module.exports = Pet;
Now from app.js we need to import (require) the bootstrap module and get the exported object (by default it will return the Pet Object cause exported it as default).
/* app.js */
/*require function takes the RELATIVE path to the module to import*/ /*Also, the required module what ever code is in there will be executed first.*/

const pet = require("./bootstrap");
console.log("Cat: ", pet);
If you try to run the start command you will get bootstrap.js module first gets executed and then it exports the Pet object returned by require().
You can also export multiple Objects from one module (Named Exports) simply by wrapping it by a module.
/* bootstrap.js */
//Some Object
const Cat = { name: "Mino", type: "Cat" };
const Dog = { name: "Lucy", type: "Dog" };

//We can also export both of the objects
module.exports = { Cat, Dog }; ///< Wrap it in an Object

/*Or you can do the same thing but setting the value under the exports objects.*/
module.exports.cat = Cat;
module.exports.dog = Dog;
You import it the same way as default exports the only difference is exporting multiple data then access it by name of the key which exported as or by default it returns the only available object.
Globals
Globals are Objects which are available on every module by default without requiring which lives on the global scope of Node.js.
It represents standard objects and function like (require, module).
Check the available globals in the **Docs**.
You can get the currently being executed module’s full path (Absolute Path) from the __filename or __dirname global variable.
console.log("Full Path: ", __filename);
Process & OS
A process is a global object which has some important info about the current running Node.js Process.
For example, you can register the event listener when your Nodejs application is about to exit (to clean up memory).
process.on('exit', (code) => {
  console.log(`About to exit with code: ${code}`);
});
OS is a standard module used to access the current operating system and get detailed information about (processor, cores, memory, kernel…).
const os = require("os");
//Get current Operating System identifying platform console.log(os.platform());
This will get you the currently running platform
win32
Events & EventEmitter
So basically Events are a type of handlers that get executed once some process is done or on error, which means on a state change, that will allow us to exchange data between the event trigger and the handler (Event Callback) which is a function handler some operation once this event is submitted, so we emit (submit) an event then we listen for it, when we emit and no listeners are available for that particular event, nothing is going to happen and our program gonna keep executing without problems (Normally).
So to recap this, Events are submitted using the emit method when some operations are completed (for ex: todo task is completed) and listen to that event by adding a handler that will execute once this event is submitted.
node js has a built it Event System that will allow you to emit and listen for events (custom or prebuilt) on your app.
Node.js has a built-in standard module called events and has an EventEmitter Object that will allow us to manipulate custom events
//Import the Standard Events and EventEmitter Modules const events = require('events');
const EventEmitter = events.EventEmitter;
/*that what we will need*/
And we can Instantiate an Object Of EventEmitter that we can use to submit and listen to events
/* app.js */ //Create a New Instance
var eventEmitter = new EventEmitter();
//emit the Event for triggering the handler
eventEmitter.emit('newUser', "alexdc");

/*Require and pass eventEmitter instance reference to bootstrap.js to use it for listening*/
require("./boostrap")(eventEmitter);
We can register the event listener(handler) in the bootstrap.js module.
/* Chalk is a third-party package allows us to print colorful text to the console */
const chalk = require("chalk");

//Export a function as a default export
module.exports = function(eventEmitter) {
   eventEmitter.on("newUser", username => {
     chalk.green("New User Has Joined the Game1 Room ", username);
   });
};
When you run the application you will get the new User has joined in message immediately and that’s because the event is emitted in the code.
Filesystem fs
Working with any framework, Dev environment or library needs from you to know the basics of dealing with files opening reading and writing to files, for Node.js makes that very easy to use, it has a standard module fs which gonna allow you to manipulate files very easily.
the fs module is a standard Node.js module with an Asynchronous and Synchronous function both could run depending on your needs you can also Promisify the fs methods to use it with async/await.
Depending on the previous Events example let’s say that we want to store the new user who joins in into our gaming room in a file under the logs/ folder.
const chalk = require("chalk");
const fs = require("fs");
//Path is a standard module to manipulating file paths
const path = require("path");
module.exports = function(eventEmitter) {
  eventEmitter.on("newUser", username => {
    //Resolve file path (converts relative to absolute path)
    const usersFilePath = path.resolve("logs/users.txt");

   /* Save new User data with current date into users.txt filer
    under logs/ Asynchronously */
   fs.writeFile( usersFilePath, `New user with Username ${username}
    Joined at ${new Date()}`, err => {
      //If there is any err stop execution and log the error details
      if (err) {
       console.error(chalk.red("Cannot Write to File!"));
       return;
      }
      console.log( chalk.green("New User Has Joined the Game1 Room",
       username));
    });
  });
};
Once running the application you will notice a new file gets created under the logs/ folder on the root directory of your project.
Simple HTTP Server
Node.js is very powerful when it comes to creating server infrastructures with a lot of powerful frameworks used specifically for that (Express) which is built on top of Node.js low-level HTTP server module.
So we will create a simple Hello World HTTP server using the standard HTTP module.
const http = require("http");
const PORT = 3000;
//Create a new instance of HTTP Server const app = new http.Server();

//Listen for a new HTTP Request (any request method)         app.on("request", (request, response) => {
  //Write response header
   response.writeHead(200, { "Content-Type": "text/plain" });
  //Response Body Data
  response.write("Hello World");
  //Terminate and Send response back to the client
  response.end();
});

//Start server and Listen on PORT
app.listen(PORT, err => {
  if (err) {
   console.error("Could not Start Server!", err);
   return;
}
 console.log("Server is Listening on http://localhost:" + PORT);
});
We register a request handler which gets executed on every request the server receives (GET, POST…).
Any HTTP server needs to listen on a specific PORT so we used 3000 cases it most of the times not being taken from other server running on our local machine but for a real-world server which gets deployed to a web hosting it has to be working on the 80 port because it is the default port of which the browser sends request to.
Now you can try to access you simple server through your browser **http://localhost:3000** you will get Hello World printed to you on the web page.
For creating advanced servers with good security I recommend learning Epxressjs.